from fastai.data.external import *核心愿景
基本的图像打开/处理功能
辅助函数
im = Image.open(TEST_IMAGE).resize((30,20))Image.n_px
Image.n_px (x:PIL.Image.Image)
test_eq(im.n_px, 30*20)Image.shape
Image.shape (x:PIL.Image.Image)
test_eq(im.shape, (20,30))Image.aspect
Image.aspect (x:PIL.Image.Image)
test_eq(im.aspect, 30/20)Image.reshape
Image.reshape (x:PIL.Image.Image, h, w, resample=0)
将 x 调整大小到 (w,h)
Image.reshape
Image.reshape (x:PIL.Image.Image, h, w, resample=0)
将 x 调整大小到 (w,h)
test_eq(im.reshape(12,10).shape, (12,10))Image.to_bytes_format
Image.to_bytes_format (im:PIL.Image.Image, format='png')
转换为字节,默认为 PNG 格式
Image.to_bytes_format
Image.to_bytes_format (im:PIL.Image.Image, format='png')
转换为字节,默认为 PNG 格式
Image.to_thumb
Image.to_thumb (h, w=None)
与 thumbnail 相同,但使用副本
Image.to_thumb
Image.to_thumb (h, w=None)
与 thumbnail 相同,但使用副本
Image.resize_max
 Image.resize_max (x:PIL.Image.Image, resample=0, max_px=None, max_h=None,
                   max_w=None)
将 x 调整大小到 max_px,或 max_h,或 max_w
test_eq(im.resize_max(max_px=20*30).shape, (20,30))
test_eq(im.resize_max(max_px=300).n_px, 294)
test_eq(im.resize_max(max_px=500, max_h=10, max_w=20).shape, (10,15))
test_eq(im.resize_max(max_h=14, max_w=15).shape, (10,15))
test_eq(im.resize_max(max_px=300, max_h=10, max_w=25).shape, (10,15))
Image.resize_max
 Image.resize_max (x:PIL.Image.Image, resample=0, max_px=None, max_h=None,
                   max_w=None)
将 x 调整大小到 max_px,或 max_h,或 max_w
基本类型
本节汇总了视觉中使用的基本类型以及创建这些类型对象的变换。
to_image
to_image (x)
将张量或数组转换为 PIL int8 图像
load_image
load_image (fn, mode=None)
打开并加载 PIL.Image 并转换为指定模式
image2tensor
image2tensor (img)
将图像转换为 c*h*w 维度顺序的字节张量。
PILBase
PILBase ()
Pillow Image 的基类,可以显示自身并转换为张量
PILBase.create
 PILBase.create
                 (fn:pathlib.Path|str|torch.Tensor|numpy.ndarray|bytes|PIL
                 .Image.Image, **kwargs)
从 fn 返回一个图像
传递给 PILBase 或继承类 create 方法的 PyTorch Tensor、NumPy ndarray 或 Pillow Image 图像必须已经是正确的 Pillow 图像格式。例如,对于 PILImage 或 PILImageBW,必须是 uint8 格式,并且分别是 RGB 或 BW。
PILBase.show
PILBase.show (ctx=None, **kwargs)
使用 merge(self._show_args, kwargs) 显示图像
PILImage
PILImage ()
一个 RGB Pillow Image,可以显示自身并转换为 TensorImage
PILImageBW
PILImageBW ()
一个 BW Pillow Image,可以显示自身并转换为 TensorImageBW
im = PILImage.create(TEST_IMAGE)
test_eq(type(im), PILImage)
test_eq(im.mode, 'RGB')
test_eq(str(im), 'PILImage mode=RGB size=1200x803')
im2 = PILImage.create(im)
test_eq(type(im2), PILImage)
test_eq(im2.mode, 'RGB')
test_eq(str(im2), 'PILImage mode=RGB size=1200x803')im.resize((64,64))
ax = im.show(figsize=(1,1))
test_fig_exists(ax)timg = TensorImage(image2tensor(im))
tpil = PILImage.create(timg)tpil.resize((64,64))
PILMask
PILMask ()
一个 Pillow Image Mask,可以显示自身并转换为 TensorMask
im = PILMask.create(TEST_IMAGE)
test_eq(type(im), PILMask)
test_eq(im.mode, 'L')
test_eq(str(im), 'PILMask mode=L size=1200x803')
图像
mnist = untar_data(URLs.MNIST_TINY)
fns = get_image_files(mnist)
mnist_fn = TEST_IMAGE_BW
timg = Transform(PILImageBW.create)
mnist_img = timg(mnist_fn)
test_eq(mnist_img.size, (28,28))
assert isinstance(mnist_img, PILImageBW)
mnist_img
分割掩码
AddMaskCodes
AddMaskCodes (codes=None)
将代码元数据添加到 TensorMask
camvid = untar_data(URLs.CAMVID_TINY)
fns = get_image_files(camvid/'images')
cam_fn = fns[0]
mask_fn = camvid/'labels'/f'{cam_fn.stem}_P{cam_fn.suffix}'
cam_img = PILImage.create(cam_fn)
test_eq(cam_img.size, (128,96))
tmask = Transform(PILMask.create)
mask = tmask(mask_fn)
test_eq(type(mask), PILMask)
test_eq(mask.size, (128,96))_,axs = plt.subplots(1,3, figsize=(12,3))
cam_img.show(ctx=axs[0], title='image')
mask.show(alpha=1, ctx=axs[1], vmin=1, vmax=30, title='mask')
cam_img.show(ctx=axs[2], title='superimposed')
mask.show(ctx=axs[2], vmin=1, vmax=30);
点
TensorPoint
TensorPoint (x, **kwargs)
图像中点的基本类型
点应以形状为 (n,2) 的数组/张量或包含两个元素的列表的列表形式提供。除非您更改 PointScaler 中的默认值(见下文),否则坐标应从 0 到宽度/高度,其中第一个坐标是列索引(即从 0 到宽度),第二个坐标是行索引(即从 0 到高度)。
注意
这与 numpy 或 PyTorch 中通常的数组索引约定不同,但这是 matplotlib 或 PyTorch 内部函数(如 F.grid_sample)所期望的点表示方式。
pnt_img = TensorImage(mnist_img.resize((28,35)))
pnts = np.array([[0,0], [0,35], [28,0], [28,35], [9, 17]])
tfm = Transform(TensorPoint.create)
tpnts = tfm(pnts)
test_eq(tpnts.shape, [5,2])
test_eq(tpnts.dtype, torch.float32)
ctx = pnt_img.show(figsize=(1,1), cmap='Greys')
tpnts.show(ctx=ctx);
边界框
get_annotations
get_annotations (fname, prefix=None)
在 fname 中打开 COCO 风格的 json 文件,并返回文件名列表(可能带 prefix)和带标签的边界框列表。
针对图像文件名和边界框标签,在 coco_tiny 数据集上测试 get_annotations。
coco = untar_data(URLs.COCO_TINY)
test_images, test_lbl_bbox = get_annotations(coco/'train.json')
annotations = json.load(open(coco/'train.json'))
categories, images, annots = map(lambda x:L(x),annotations.values())

test_eq(test_images, images.attrgot('file_name'))

def bbox_lbls(file_name):
    img = images.filter(lambda img:img['file_name']==file_name)[0]
    bbs = annots.filter(lambda a:a['image_id'] == img['id'])
    i2o = {k['id']:k['name'] for k in categories}
    lbls = [i2o[cat] for cat in bbs.attrgot('category_id')]
    bboxes = [[bb[0],bb[1], bb[0]+bb[2], bb[1]+bb[3]] for bb in bbs.attrgot('bbox')]
    return [bboxes, lbls]

for idx in random.sample(range(len(images)),5):
test_eq(test_lbl_bbox[idx], bbox_lbls(test_images[idx]))TensorBBox
TensorBBox (x, **kwargs)
图像中边界框张量的基本类型
边界框应以形状为 (n,4) 的数组/张量或包含四个元素的列表的列表形式提供,并附带相应的标签列表。除非您更改 PointScaler 中的默认值(见下文),否则每个边界框的坐标应从 0 到宽度/高度,遵循以下约定:x1, y1, x2, y2,其中 (x1,y1) 是左上角,(x2,y2) 是右下角。
注意
我们对 x 使用与点相同的约定,范围从 0 到宽度,y 范围从 0 到高度。
LabeledBBox
LabeledBBox (items=None, *rest, use_list=False, match=None)
图像中边界框列表的基本类型
coco = untar_data(URLs.COCO_TINY)
images, lbl_bbox = get_annotations(coco/'train.json')
idx=2
coco_fn,bbox = coco/'train'/images[idx],lbl_bbox[idx]
coco_img = timg(coco_fn)
tbbox = LabeledBBox(TensorBBox(bbox[0]), bbox[1])
ctx = coco_img.show(figsize=(3,3), cmap='Greys')
tbbox.show(ctx=ctx);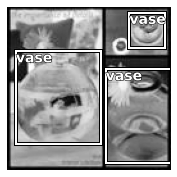
基本变换
除非特别提及,以下所有变换既可以用作单项变换(在您传递给 TfmdDS 或 Datasource 的 tfms 列表之一中),也可以用作元组变换(在您传递给 TfmdDS 或 Datasource 的 tuple_tfms 中)。最安全且适用于各种应用的方式是始终将它们用作 tuple_tfms。例如,如果您的目标是点或边界框,并使用 Resize 作为单项变换,那么当您到达 PointScaler(它是一个元组变换)时,您将无法获得正确的图像尺寸来正确缩放您的点。
ToTensor
ToTensor (enc=None, dec=None, split_idx=None, order=None)
将项目转换为适当的张量类
ToTensor
ToTensor (enc=None, dec=None, split_idx=None, order=None)
将项目转换为适当的张量类
任何在 PIL 图像上运行的数据增强变换都必须在此变换之前运行。
tfm = ToTensor()
print(tfm)
print(type(mnist_img))
print(type(tfm(mnist_img)))
ToTensor(enc:2,dec:0)
<class '__main__.PILImageBW'>
<class 'fastai.torch_core.TensorImageBW'>tfm = ToTensor()
test_eq(tfm(mnist_img).shape, (1,28,28))
test_eq(type(tfm(mnist_img)), TensorImageBW)
test_eq(tfm(mask).shape, (96,128))
test_eq(type(tfm(mask)), TensorMask)让我们确认可以将其与 PILImage.create 管道化处理。
pipe_img = Pipeline([PILImageBW.create, ToTensor()])
img = pipe_img(mnist_fn)
test_eq(type(img), TensorImageBW)
pipe_img.show(img, figsize=(1,1));
def _cam_lbl(x): return mask_fn
cam_tds = Datasets([cam_fn], [[PILImage.create, ToTensor()], [_cam_lbl, PILMask.create, ToTensor()]])
show_at(cam_tds, 0);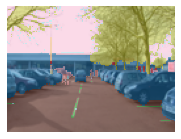
为了与数据增强(特别是 grid_sample 方法)一起工作,点需要以 -1 到 1 的坐标表示(-1 表示顶部或左侧,1 表示底部或右侧),这将自动完成,除非您传递 do_scale=False。我们还需要确保它们遵循我们点为 x,y 坐标的约定,如果您的数据是 y,x 格式,请传递 y_first=True 以添加翻转。
警告
此变换需要在元组级别运行,在任何改变图像大小的变换之前。
PointScaler
PointScaler (do_scale=True, y_first=False)
缩放表示点的张量
为了与数据增强(特别是 grid_sample 方法)一起工作,点需要以 -1 到 1 的坐标表示(-1 表示顶部或左侧,1 表示底部或右侧),这将自动完成,除非您传递 do_scale=False。我们还需要确保它们遵循我们点为 x,y 坐标的约定,如果您的数据是 y,x 格式,请传递 y_first=True 以添加翻转。
注意
此变换会自动抓取在 TensorPoint 对象之前看到的图像尺寸,并将其嵌入其中。为了使此功能正常工作,这些图像需要位于您的最终元组中的点之前。如果您没有此类图像,则需要在创建 TensorPoint 时通过传递 sz=... 来嵌入相应图像的尺寸。
def _pnt_lbl(x): return TensorPoint.create(pnts)
def _pnt_open(fn): return PILImage(PILImage.create(fn).resize((28,35)))
pnt_tds = Datasets([mnist_fn], [_pnt_open, [_pnt_lbl]])
pnt_tdl = TfmdDL(pnt_tds, bs=1, after_item=[PointScaler(), ToTensor()])
test_eq(pnt_tdl.after_item.c, 10)x,y = pnt_tdl.one_batch()
#Scaling and flipping properly done
#NB: we added a point earlier at (9,17); formula below scales to (-1,1) coords
test_close(y[0], tensor([[-1., -1.], [-1., 1.], [1., -1.], [1., 1.], [9/14-1, 17/17.5-1]]))
a,b = pnt_tdl.decode_batch((x,y))[0]
test_eq(b, tensor(pnts).float())
#Check types
test_eq(type(x), TensorImage)
test_eq(type(y), TensorPoint)
test_eq(type(a), TensorImage)
test_eq(type(b), TensorPoint)
test_eq(b.img_size, (28,35)) #Automatically picked the size of the inputpnt_tdl.show_batch(figsize=(2,2), cmap='Greys');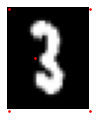
BBoxLabeler
BBoxLabeler (enc=None, dec=None, split_idx=None, order=None)
如果 split_idx 匹配,则将委托(__call__、decode、setup)到(encodes、decodes、setups)
MultiCategorize
MultiCategorize (vocab=None, add_na=False)
将多类别字符串可逆变换为 vocab ID
PointScaler
PointScaler (do_scale=True, y_first=False)
缩放表示点的张量
PointScaler
PointScaler (do_scale=True, y_first=False)
缩放表示点的张量
def _coco_bb(x): return TensorBBox.create(bbox[0])
def _coco_lbl(x): return bbox[1]
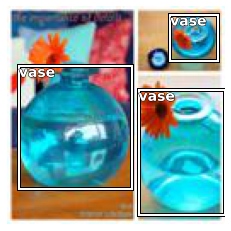
coco_tds = Datasets([coco_fn], [PILImage.create, [_coco_bb], [_coco_lbl, MultiCategorize(add_na=True)]], n_inp=1)
coco_tdl = TfmdDL(coco_tds, bs=1, after_item=[BBoxLabeler(), PointScaler(), ToTensor()])Categorize(add_na=True)Categorize -- {'vocab': None, 'sort': True, 'add_na': True}
(enc:1,dec:1)coco_tds.tfms(#3) [Pipeline: PILBase.create,Pipeline: _coco_bb,Pipeline: _coco_lbl -> MultiCategorize -- {'vocab': None, 'sort': True, 'add_na': True}]x,y,z(PILImage mode=RGB size=128x128,
TensorBBox([[-0.9011, -0.4606, 0.1416, 0.6764],
[ 0.2000, -0.2405, 1.0000, 0.9102],
[ 0.4909, -0.9325, 0.9284, -0.5011]]),
TensorMultiCategory([1, 1, 1]))x,y,z = coco_tdl.one_batch()
test_close(y[0], -1+tensor(bbox[0])/64)
test_eq(z[0], tensor([1,1,1]))
a,b,c = coco_tdl.decode_batch((x,y,z))[0]
test_close(b, tensor(bbox[0]).float())
test_eq(c.bbox, b)
test_eq(c.lbl, bbox[1])
#Check types
test_eq(type(x), TensorImage)
test_eq(type(y), TensorBBox)
test_eq(type(z), TensorMultiCategory)
test_eq(type(a), TensorImage)
test_eq(type(b), TensorBBox)
test_eq(type(c), LabeledBBox)
test_eq(y.img_size, (128,128))coco_tdl.show_batch();