医学影像

处理 DICOM 文件的辅助函数

修补


get_dicom_files

 get_dicom_files (path, recurse=True, folders=None)

递归获取 path 中的 dicom 文件,如果指定,仅限于 folders


Path.dcmread

 Path.dcmread (fn:pathlib.Path, force=False)

打开 DICOM 文件

fastai.medical.imaging 使用 pydicom.dcmread 读取 DICOM 文件。要查看 DICOM 的 header,请指定测试文件的 path 并调用 dcmread

TEST_DCM = Path('images/sample.dcm')
dcm = TEST_DCM.dcmread()
dcm
Dataset.file_meta -------------------------------
(0002, 0000) File Meta Information Group Length  UL: 176
(0002, 0001) File Meta Information Version       OB: b'\x00\x01'
(0002, 0002) Media Storage SOP Class UID         UI: CT Image Storage
(0002, 0003) Media Storage SOP Instance UID      UI: 9999.180975792154576730321054399332994563536
(0002, 0010) Transfer Syntax UID                 UI: Explicit VR Little Endian
(0002, 0012) Implementation Class UID            UI: 1.2.40.0.13.1.1.1
(0002, 0013) Implementation Version Name         SH: 'dcm4che-1.4.38'
-------------------------------------------------
(0008, 0018) SOP Instance UID                    UI: ID_e0cc6a4b5
(0008, 0060) Modality                            CS: 'CT'
(0010, 0020) Patient ID                          LO: 'ID_a107dd7f'
(0020, 000d) Study Instance UID                  UI: ID_6468bdd34a
(0020, 000e) Series Instance UID                 UI: ID_4be303ae64
(0020, 0010) Study ID                            SH: ''
(0020, 0032) Image Position (Patient)            DS: [-125.000, -122.268, 115.936]
(0020, 0037) Image Orientation (Patient)         DS: [1.000000, 0.000000, 0.000000, 0.000000, 0.978148, -0.207912]
(0028, 0002) Samples per Pixel                   US: 1
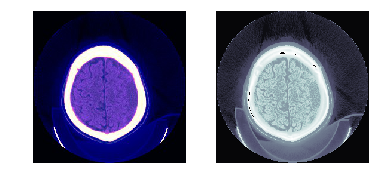
(0028, 0004) Photometric Interpretation          CS: 'MONOCHROME2'
(0028, 0010) Rows                                US: 256
(0028, 0011) Columns                             US: 256
(0028, 0030) Pixel Spacing                       DS: [0.488281, 0.488281]
(0028, 0100) Bits Allocated                      US: 16
(0028, 0101) Bits Stored                         US: 16
(0028, 0102) High Bit                            US: 15
(0028, 0103) Pixel Representation                US: 1
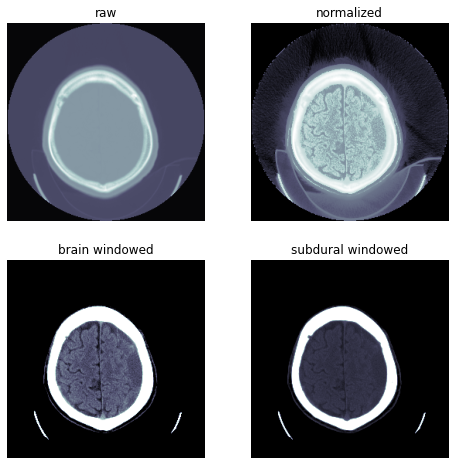
(0028, 1050) Window Center                       DS: "40.0"
(0028, 1051) Window Width                        DS: "100.0"
(0028, 1052) Rescale Intercept                   DS: "-1024.0"
(0028, 1053) Rescale Slope                       DS: "1.0"
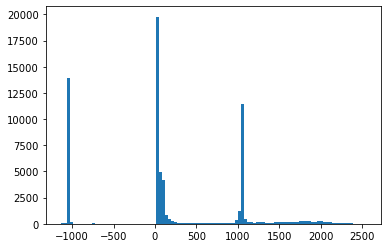
(7fe0, 0010) Pixel Data                          OW: Array of 131072 elements
type(dcm)
pydicom.dataset.FileDataset

TensorDicom

 TensorDicom (x, **kwargs)

继承自 TensorImage 并将 pixel_array 转换为 TensorDicom


PILDicom

 PILDicom ()

Pillow Image 的基类,可以显示自身并转换为 Tensor


Path.png16read

 Path.png16read ()

Dataset.pixels

 Dataset.pixels ()

作为 tensor 的 pixel_array

dcm.pixels
tensor([[-1024., -1024., -1024.,  ..., -1024., -1024., -1024.],
        [-1024., -1024., -1024.,  ..., -1024., -1024., -1024.],
        [-1024., -1024., -1024.,  ..., -1024., -1024., -1024.],
        ...,
        [-1024., -1024., -1024.,  ..., -1024., -1024., -1024.],
        [-1024., -1024., -1024.,  ..., -1024., -1024., -1024.],
        [-1024., -1024., -1024.,  ..., -1024., -1024., -1024.]])

Dataset.scaled_px

 Dataset.scaled_px ()

RescaleSlopeRescaleIntercept 缩放的 pixels

scaled_px 使用 RescaleSlopeRescaleIntercept 值来正确缩放图像,使其代表正确的组织密度。您可以通过查看 dicom 图像的像素分布来观察 scaled_px 的作用。下面的直方图显示了当前的像素分布,其像素范围在 -11332545 之间。

plt.hist(dcm.pixels.flatten().numpy());

如测试图像的 header 所示,RescaleIntercept 的值为 -1024.0RescaleSlope 的值为 1.0scaled_px 将通过这些值来缩放像素。

plt.hist(dcm.scaled_px.flatten().numpy());

像素分布现在在 -21571521 之间


array_freqhist_bins

 array_freqhist_bins (n_bins=100)

一个基于 numpy 的函数,将像素值范围分割成组,使每组包含大致相同数量的像素


Tensor.freqhist_bins

 Tensor.freqhist_bins (n_bins=100)

一个将像素值范围分割成组的函数,使每组包含大致相同数量的像素

例如,将 n_bins 设置为 1 意味着 bins 将被分成 3 个不同的 bins(开始、结束和由 n_bins 指定的 bin 数量)。

t_bin = dcm.pixels.freqhist_bins(n_bins=1)
t_bin
tensor([-1076.,    40.,  2375.])
plt.hist(t_bin.numpy(), bins=t_bin, color='c')
plt.plot(t_bin, torch.linspace(0,1,len(t_bin)));

n_bins 为 100 时

t_bin = dcm.pixels.freqhist_bins(n_bins=100)
t_bin
tensor([-1076., -1026., -1024., -1021.,    28.,    30.,    31.,    32.,    33.,
           34.,    35.,    36.,    37.,    38.,    39.,    40.,    41.,    42.,
           44.,    48.,    52.,    58.,    66.,    72.,    76.,    80.,    85.,
           91.,    94.,    98.,   103.,   111.,   123.,   161.,   219.,   478.,
          829.,   999.,  1027.,  1038.,  1044.,  1047.,  1049.,  1050.,  1051.,
         1052.,  1053.,  1054.,  1055.,  1056.,  1057.,  1058.,  1059.,  1060.,
         1062.,  1066.,  1108.,  1265.,  1453.,  1616.,  1741.,  1838.,  1943.,
         2051.,  2220.,  2375.])
plt.hist(t_bin.numpy(), bins=t_bin, color='c'); plt.plot(t_bin, torch.linspace(0,1,len(t_bin)));


Tensor.hist_scaled_pt

 Tensor.hist_scaled_pt (brks=None)

Tensor.hist_scaled

 Tensor.hist_scaled (brks=None)

使用 freqhist_bins 将 tensor 缩放到 0 到 1 之间的值

测试图像的像素值范围在 -10002500 之间

plt.hist(dcm.pixels.flatten().numpy(), bins=100);

hist_scaled 提供了一种将输入像素值缩放到 01 之间的方法

tensor_hists = dcm.pixels.hist_scaled()
plt.hist(tensor_hists.flatten().numpy(), bins=100);


Dataset.hist_scaled

 Dataset.hist_scaled (brks=None, min_px=None, max_px=None)

像素缩放到 min_pxmax_px

data_scaled = dcm.hist_scaled()
plt.imshow(data_scaled, cmap=plt.cm.bone);

data_scaled = dcm.hist_scaled(min_px=100, max_px=1000)
plt.imshow(data_scaled, cmap=plt.cm.bone);

Dicom 图像可以包含大量的体素值,窗宽窗位可以被视为一种操作这些值的方法,以改变图像的外观,从而突出特定结构。一个窗有 2 个值

  • l = 窗位或中心,即亮度
  • w = 窗宽或范围,即对比度

Tensor.windowed

 Tensor.windowed (w, l)

按窗宽和窗位缩放像素强度


Dataset.windowed

 Dataset.windowed (w, l)
plt.imshow(dcm.windowed(*dicom_windows.brain), cmap=plt.cm.bone);


TensorCTScan

 TensorCTScan (x, **kwargs)

继承自 TensorImageBW 并将 pixel_array 转换为 TensorCTScan

tensor_ct = TensorCTScan(dcm.pixel_array)
tensor_ct.show();


PILCTScan

 PILCTScan ()

Pillow Image 的基类,可以显示自身并转换为 Tensor


Dataset.show

 Dataset.show (scale=True, cmap=<matplotlib.colors.LinearSegmentedColormap
               object at 0x7fd370bb1910>, min_px=-1100, max_px=None,
               ax=None, figsize=None, title=None, ctx=None, norm=None,
               aspect=None, interpolation=None, alpha=None, vmin=None,
               vmax=None, colorizer=None, origin=None, extent=None,
               interpolation_stage=None, filternorm=True, filterrad=4.0,
               resample=None, url=None, data=None)

默认显示归一化的 dicom 图像

scales = False, True, dicom_windows.brain, dicom_windows.subdural
titles = 'raw','normalized','brain windowed','subdural windowed'
for s,a,t in zip(scales, subplots(2,2,imsize=4)[1].flat, titles):
    dcm.show(scale=s, ax=a, title=t)

dcm.show(cmap=plt.cm.gist_ncar, figsize=(6,6))

一些 dicom 数据集,例如 超声甲状腺分割数据集 是每个图像文件包含多个帧(本例中为数百帧)的数据集。默认情况下,show 函数将显示 1 帧,但如果数据集包含多个帧,您可以指定要查看的帧数。


Dataset.show

 Dataset.show (frames=1, scale=True,
               cmap=<matplotlib.colors.LinearSegmentedColormap object at
               0x7fd370bb1910>, min_px=-1100, max_px=None, **kwargs)

添加查看每个文件可能包含多个帧的 dicom 图像的功能

dcm.show()


Dataset.pct_in_window

 Dataset.pct_in_window (dcm:pydicom.dataset.Dataset, w, l)

窗口 (w,l) 中像素的百分比

dcm.pct_in_window(*dicom_windows.brain)
0.19049072265625

pct_in_window 可用于检查图像中有意义像素(指定窗口内的像素)的百分比


uniform_blur2d

 uniform_blur2d (x, s)

均匀应用模糊

ims = dcm.hist_scaled(), uniform_blur2d(dcm.hist_scaled(), 20), uniform_blur2d(dcm.hist_scaled(), 50)
show_images(ims, titles=('original', 'blurred 20', 'blurred 50'))


gauss_blur2d

 gauss_blur2d (x, s)

应用 gaussian_blur2d kornia 滤波器

ims = dcm.hist_scaled(), gauss_blur2d(dcm.hist_scaled(), 20), gauss_blur2d(dcm.hist_scaled(), 50)
show_images(ims, titles=('original', 'gauss_blur 20', 'gauss_blur 50'))

图像经常受到强度值随机变化的影响,这被称为噪声。高斯噪声包含从高斯或正态分布中提取的强度变化。高斯滤波器通常用于模糊边缘并去除较小或较细的区域,以保留最重要的信息


Tensor.mask_from_blur

 Tensor.mask_from_blur (x:torch.Tensor, window, sigma=0.3, thresh=0.05,
                        remove_max=True)

从模糊图像创建遮罩


Dataset.mask_from_blur

 Dataset.mask_from_blur (x:pydicom.dataset.Dataset, window, sigma=0.3,
                         thresh=0.05, remove_max=True)

从模糊图像创建遮罩

mask = dcm.mask_from_blur(dicom_windows.brain, sigma=0.9, thresh=0.1, remove_max=True)
wind = dcm.windowed(*dicom_windows.brain)

_,ax = subplots(1,3)
show_image(wind, ax=ax[0], title='window')
show_image(mask, alpha=0.5, cmap=plt.cm.Reds, ax=ax[1], title='mask')
show_image(wind, ax=ax[2])
show_image(mask, alpha=0.5, cmap=plt.cm.Reds, ax=ax[2], title='window and mask');


mask2bbox

 mask2bbox (mask)
bbs = mask2bbox(mask)
lo,hi = bbs
show_image(wind[lo[0]:hi[0],lo[1]:hi[1]]);


crop_resize

 crop_resize (x, crops, new_sz)
px256 = crop_resize(to_device(wind[None]), bbs[...,None], 128)[0]
show_image(px256)
px256.shape
torch.Size([1, 128, 128])

将原始图像与使用 maskcrop_resize 函数生成的图像进行比较

_,axs = subplots(1,2)
dcm.show(ax=axs[0])
show_image(px256, ax=axs[1]);


Tensor.to_nchan

 Tensor.to_nchan (x:torch.Tensor, wins, bins=None)

Dataset.to_nchan

 Dataset.to_nchan (x:pydicom.dataset.Dataset, wins, bins=None)

to_nchan 将 tensor 或 dicom 作为输入,并返回多个单通道图像(第一个取决于所选的 windows 和一个归一化图像)。将 bins 设置为 0 只返回窗宽窗位处理后的图像。

show_images(dcm.to_nchan([dicom_windows.brain], bins=0))

show_images(dcm.to_nchan([dicom_windows.brain], bins=None))


Tensor.to_3chan

 Tensor.to_3chan (x:torch.Tensor, win1, win2, bins=None)

Dataset.to_3chan

 Dataset.to_3chan (x:pydicom.dataset.Dataset, win1, win2, bins=None)
show_images(dcm.to_nchan([dicom_windows.brain,dicom_windows.subdural,dicom_windows.abdomen_soft]))


save_jpg’]

*内置可变序列。

如果未给定参数,则构造函数创建一个新的空列表。如果指定了参数,则必须是可迭代对象。*


to_uint16’]

*内置可变序列。

如果未给定参数,则构造函数创建一个新的空列表。如果指定了参数,则必须是可迭代对象。*


save_tif16’]

*内置可变序列。

如果未给定参数,则构造函数创建一个新的空列表。如果指定了参数,则必须是可迭代对象。*

_,axs=subplots(1,2)
with tempfile.TemporaryDirectory() as f:
    f = Path(f)
    dcm.save_jpg(f/'test.jpg', [dicom_windows.brain,dicom_windows.subdural])
    show_image(Image.open(f/'test.jpg'), ax=axs[0])
    dcm.save_tif16(f/'test.tif')
    show_image(Image.open(str(f/'test.tif')), ax=axs[1]);


Dataset.set_pixels

 Dataset.set_pixels (px)

Dataset.zoom

 Dataset.zoom (ratio)

按指定比例缩放图像

检查 dicom 图像的当前尺寸

dcm.pixel_array.shape
(256, 256)
dcm.zoom(7.0)
dcm.show(); dcm.pixel_array.shape


Dataset.zoom_to

 Dataset.zoom_to (sz)

将图像尺寸更改为指定的像素尺寸

dcm.zoom_to(200); dcm.pixel_array.shape
(200, 200)

Dataset.shape

 Dataset.shape ()

以行和列的形式返回 dicom 图像的形状

dcm2 = TEST_DCM.dcmread()
dcm2.zoom_to(90)
test_eq(dcm2.shape, (90,90))
dcm2 = TEST_DCM.dcmread()
dcm2.zoom(0.25)
dcm2.show()


Dataset.as_dict

 Dataset.as_dict (px_summ=True, window=(80, 40))

将 dicom 文件的头部信息转换为字典

as_dict 接受 2 个参数:px_summ 默认为 True,这将返回附加统计信息,例如最小像素值、最大像素值、平均像素值和图像标准差。window 参数根据指定的 window 计算 pct_in_window 值。

dcm.as_dict(px_summ=True, window=dicom_windows.brain);

创建一个包含 dicom header 中值的 dataframe

pneumothorax_source = untar_data(URLs.SIIM_SMALL)
items = get_dicom_files(pneumothorax_source, recurse=True,  folders='train')
dicom_dataframe = pd.DataFrame.from_dicoms(items, window=dicom_windows.brain, px_summ=True)
dicom_dataframe.head(2).T.tail(5)
0 1
img_min 0 0
img_max 254 250
img_mean 160.398 114.525
img_std 53.8549 70.7523
img_pct_window 0.0870295 0.326269

DicomSegmentationDataLoaders

 DicomSegmentationDataLoaders (*loaders, path:str|pathlib.Path='.',
                               device=None)

DICOM DataLoaders 的基本封装,带有用于分割问题的工厂方法

类型 默认值 详情
loaders VAR_POSITIONAL 要封装的 DataLoader 对象
path str | pathlib.Path . 存储导出对象的路径
device NoneType None 放置 DataLoaders 的设备
path = untar_data(URLs.TCGA_SMALL)
codes = np.loadtxt(path/'codes.txt', dtype=str)
fnames = get_dicom_files(path/'dicoms')
label_func = lambda o: path/'labels'/f'{o.stem}.png'

dls = DicomSegmentationDataLoaders.from_label_func(path, fnames, label_func, codes=codes, bs=4)
dls.show_batch()